README! There are many use cases for dual booting and guides for achieving it, this one concerns moving an existing Linux to a drive on which Windows is already installed and dual booting them. In other words, you will be combining existing Windows and Linux systems to coexist on the same hard drive.
I’ve been using the same hard drive for a while and transporting it from laptop to laptop whenever one would fail me (you can do that with linux). Now, after 8 years, I was fearing it was the actual hard drive that would break next so this time, I had to move my actual operating system to another physical disk.
Wanting to be able to dual boot into windows as well, I was stuck in a scenario for which there was not much help on the web. Here’s what I did:
Resize your Windows partition using the disk management tool to make room for Linux and its swap. The new Linux partition must be larger that the one you are moving from.
Reboot to a Linux live CD or GParted and create a bootable Linux and a swap partition (they must be primary) after the Windows partition.
Clone you existing Linux OS partition from the old hard drive to the new.
Plug in your old drive (external SATA, external disk case, extra hard-drive bay, etc.) but leave it unmounted.
dd if=/dev/sdXY of=/dev/sdWZ bs=1M
where XY is the drive letter and partition of the Linux OS you are moving from and WZ those of the partition you are moving to.
Wait for a while, depending on the size of the partition, this could take a bit because you are cloning every single byte from one partition to the other. In my case, it tool a good solid two hours and half.
Unmount and disconnect your old Linux OS hard drive. In case something goes wrong, simply popping it back in your computer will restore your setup just the way it was before.
Mount your new Linux partition.
From within the Live CD, restore the GRUB2 bootloader by executing
where mountPoint is where you new Linux partition is mounted and sdW is the drive where it resides.
Since the partition’s GUIDs have changed you need to update the /etc/fstab file on your Linux with the new ones. Any file editor will do. Look up the new GUIDs for your new OS and swap partitions by running
ls -al /dev/disk/by-uuid/
Remove the live CD and restart the computer. From within GRUB2’s boot menu, you should only see your Linux and not Windows, that’s normal. Boot your Linux OS.
Run
grub-mkconfig -o /boot/grub2/grub.cfg
GRUB2 will scan your hard drive, find the Windows install and create a new boot configuration file. Now, when you reboot your machine, you will see Windows within the boot menu menu entries.
Finally, since the size of the underlying partition holding your Linux installation has changed, the size of the file system has to be updated as well:
resize2fs /dev/sdW
Done! Moving operating systems around and getting them to cohabit alongside each other is tricky and far from being straightforward so I hope this guide worked for you. You will most likely have to adapt it to your own situation and if you feel something you did could benefit others, please comment.
Note (09/01/17): also worked on a recent upgrade from 23 to 25.
I had put off system upgrades for so long that I found myself having to go from Fedora 20 to 23. It took a while but everything was going smoothly until I hit Fedora 23 on. There, after the mandatory reboot, hooking up my secondary monitor would freeze the display and screen repainting on some programs (like Eclipse) had become problematically slow and CPU demanding. This being Linux, I scoured the web on a quest to find some clues on what was not configured correctly but nothing came up. I’m running an AMD A6-3420M APU and while AMD provides driver for that chip, they are according to reports very finicky and a pile of trouble to get running.
I resorted to simply downgrading the driver. It was working correctly in the past, so I could see no obvious reason an older version would not do it this time.
First find the version of the driver currently installed:
dnf info xorg-x11-drv-ati
Which should spit out something along the lines of:
Installed Packages
Name        : xorg-x11-drv-ati
Arch        : i686
Epoch       : 0
Version     : 7.6.0
Release     : 0.4.20150729git5510cd6.fc23
Size        : 151 k
Repo        : fedora
Summary     : Xorg X11 ati video driver
URL         : http://www.x.org
License     : MIT
Description : X.Org X11 ati video driver.
Here, we’re asking dnf to go look in a previous release of Fedora for an earlier version of the driver. If the problems you are experiencing appeared with a recent update, you could avoid the –releasever argument altogether to just revert back to the previous version.
If the downgrade does not work, you rerun the command to roll back the driver even further in the past, but if after a couple times you haven’t had success, the issue probably lies with another package so run a dnf update to and take your investigation elsewhere, maybe the kernel, wayland, X, the window composer or gnome-shell.
When you update your system in the future, you’ll have to run:
sudo dnf --exclude=xorg-x11-drv-ati update
Otherwise, dnf will reinstall the broken later version of the package. This command will also give you packages with broken dependencies. That’s normal, those are packages that share dependencies with the one you have downgraded and for all I know could actually have been the ones causing you trouble. Just let them be.
Make sure you check back from time to time if another version of the offending package has been released by issuing a simple dnf update and checking the version now available.
Note: this post about an electronics project has been sitting as a draft since 2011 so some of its content might appear outdated. Regardless, I’ve been using the device since then so I figured I should commit it to posterity.
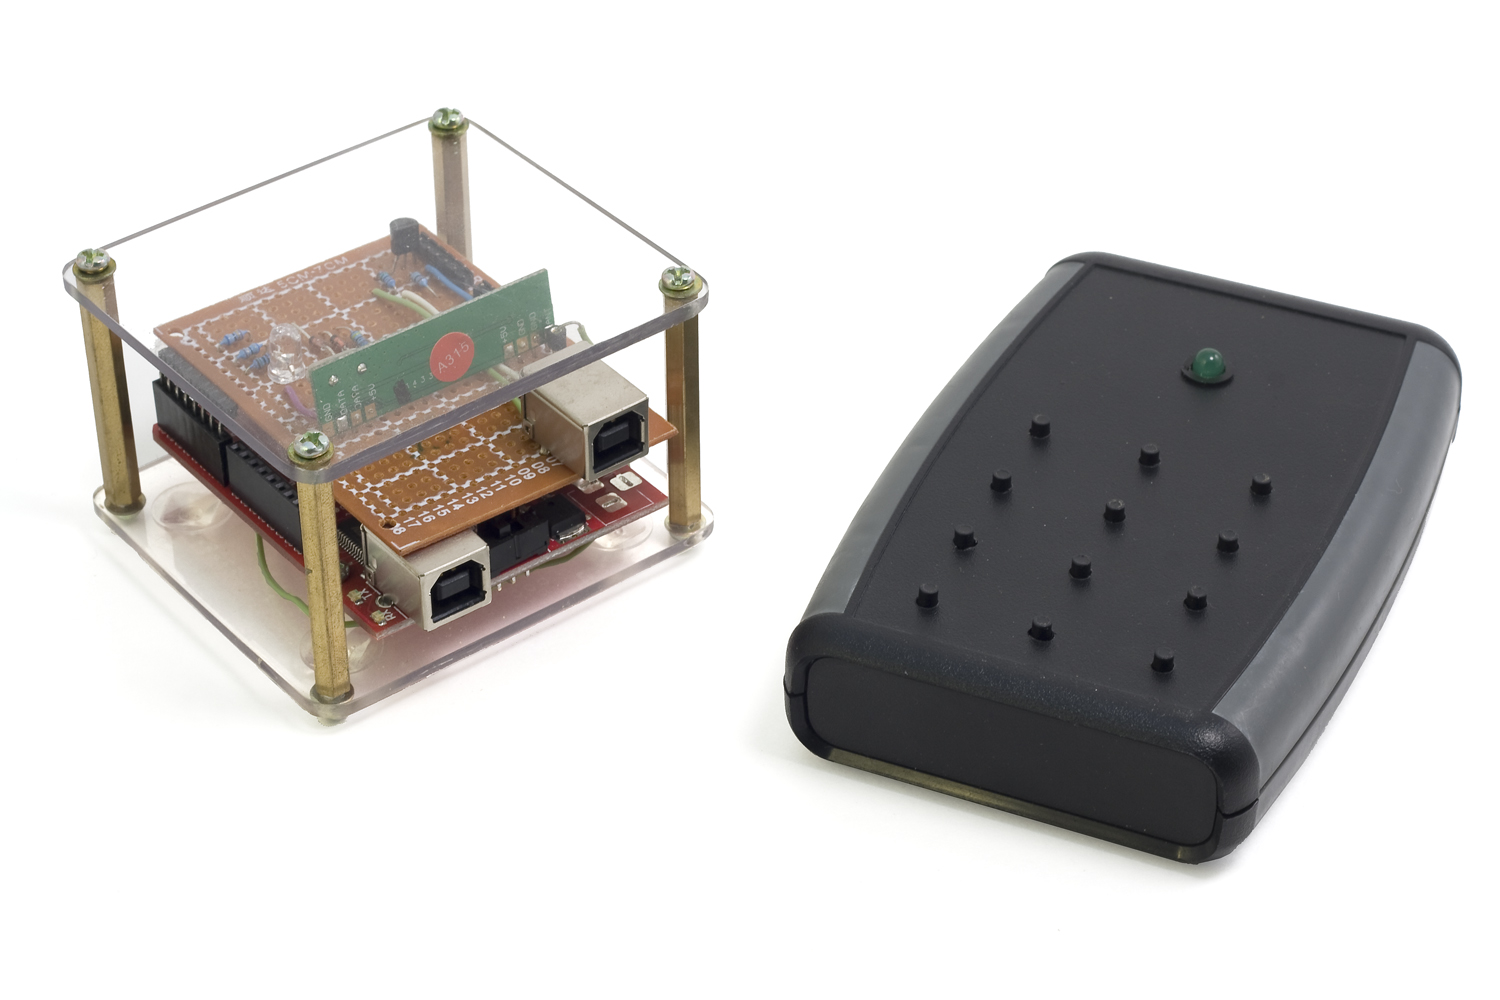
To my computer, its simply a USB keyboard, nothing less, but to me its a remote I can use on any platform with no line of sight. I decided to name it the keyMote. Sounds a bit odd to my ears but its a fitting name.
Here is how it works. There are two parts to this system, the remote, which is battery powered, and the base, which is hooked up to a computer. The remote is a simple keypad (In the case of the prototype, its a numeric keypad, but really, it could be any interface) with a transmitter hooked up to it. The base, the other end, is a receiver with USB Human interface device functionality, in other words, a vanilla USB keyboard. When a button is pressed, the remote sends the identifier of that button to the base which then looks up in a table the keystrokes this identifier is mapped to and sends those to the computer via USB. What button is mapped to what keystroke is entirely configurable using a serial terminal interface (shell) to the base. It can be anything, Ctrl-C, Alt-Shift-F, PageUp, etc. Getting it to interface with your program is then simply a matter of configuring keyboard shortcuts.
The use case
Here is the actual use case that spawned the idea. I was doing some plumbing work in my kitchen with the computer playing songs in the background. It then hit one in the playlist that I especially hate (but keep for nostalgia), but I was in no position to change it as it would have implied bending out of underneath my sink, walking to my computer and then hitting Ctrl + Shift + Right to skip to the next tune. I use Linux and at that time, the media buttons on my keyboard were not operational, I knew very few remotes would work on my platform and finally, I had no line of sight with the computer, so infrared was out of the question. Agreed, a wireless keyboard would have done the trick, but those tend to be limited in range, and well, they are still keyboards, so you have to do the key combinations yourself and are somewhat cumbersome to lug around. So I thought: Why not get something that will emulate my hands typing the keyboard shortcuts?
I looked around for possible off-the-shelf solutions, but none of them were well supported under Linux; basically they all required drivers and were proprietary and as we all know, anything with a driver is dependent on company support an will get dumped sooner of later. The keyboard idea was starting to get some traction. It was the obvious medium to go with, the USB human interface device standard has been around for a decade or so and will likely stick for a few more but more importantly, it is understood by most OSes. Failing to come across anything that would suit my purpose, I set out to develop one from scratch and after a bit of work (or a lot, depending where you come from), I had what I wanted: a simple, rugged self-contained system with no drivers attached, plenty of battery life and a way to make it type whatever I want. Currently, its mapped to my MP3 player, sound controls, Video player controls and some programming IDE functions. It could very well launch applications, toggle the visibility of certain windows (via the window manager), start scripts; it can do anything a keyboard can do.
The system
The main hardware components are an arduino, a wireless receiver and transmitter pair and another microcontroller hooked up to a battery in the remote. I started off with trying out wireless communication on the arduino IDE but soon converted to C/C++ for the added flexibility once I was past figuring out the libraries.
Base
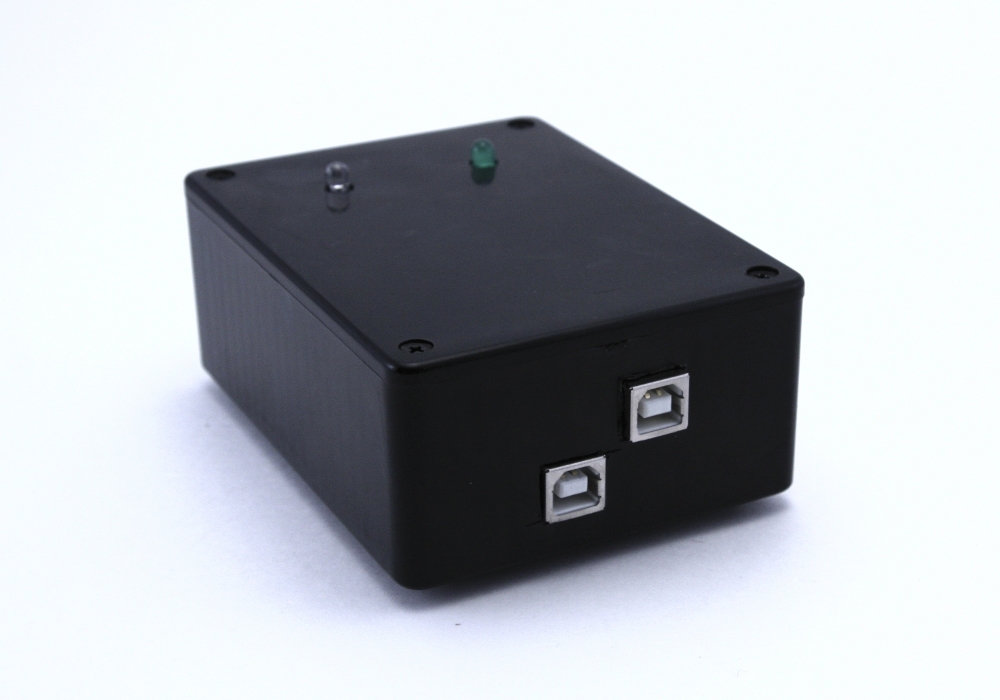
The base software is mainly an interface between two libraries, VirtualWire and V-USB along with a shell to configure the mapping between remote key codes and key strokes. VirtualWire is a library that makes exchanging bits (a lot harder than the datasheet implies, what you send on TX is quite what you get on RX) between vanilla wireless interfaces very straightforward. V-USB is a marvelous implementation of the USB protocol on the AVR using nothing but bit-banging. It’s quite limited in capacity but it’s extremely lean and makes USB accessible for anyone with the patience to understand the protocol. While the actual serial shell is a fair chunk of code, it is needed only for configuration, so this project is mainly composed of glue code and basic electronics. The arduino’s USB connector is used for serial shell functionality, where using commands it is possible to consult statistics about the system, get debugging data, but more importantly map key Ids to key strokes. The other USB connector is the actual keyboard.
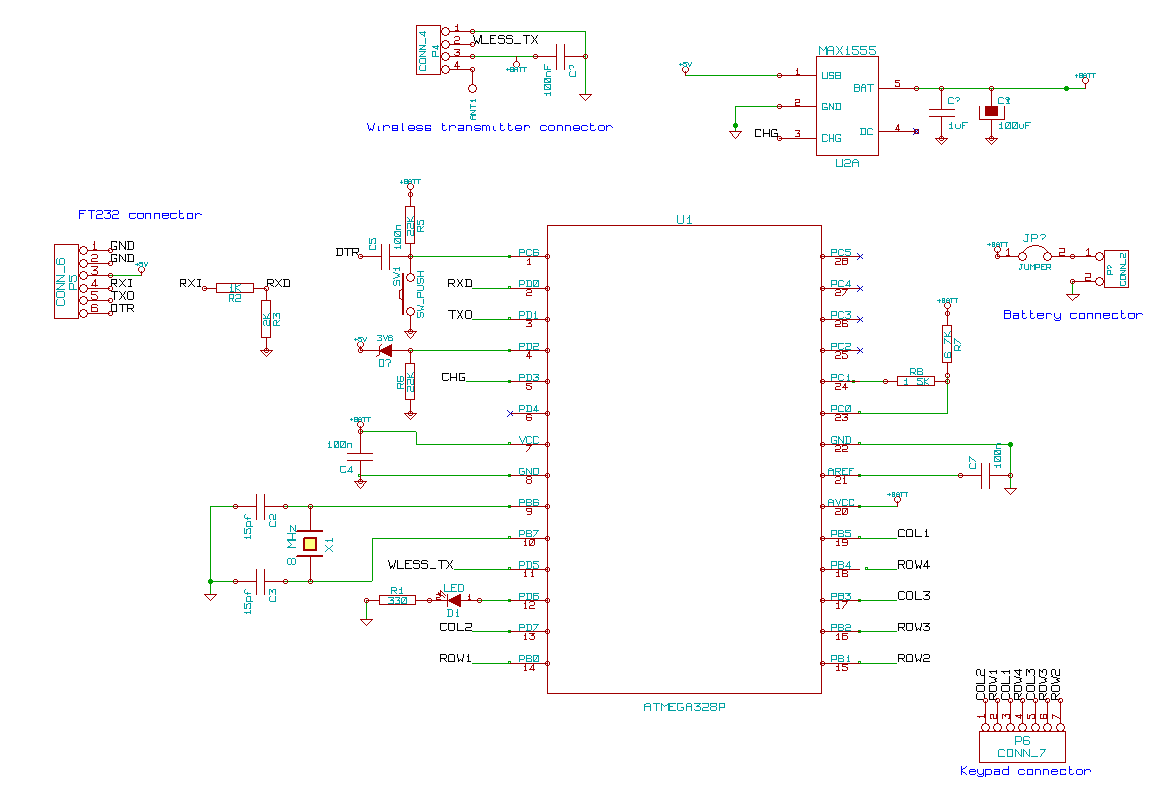
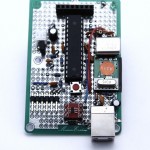
The base schematic
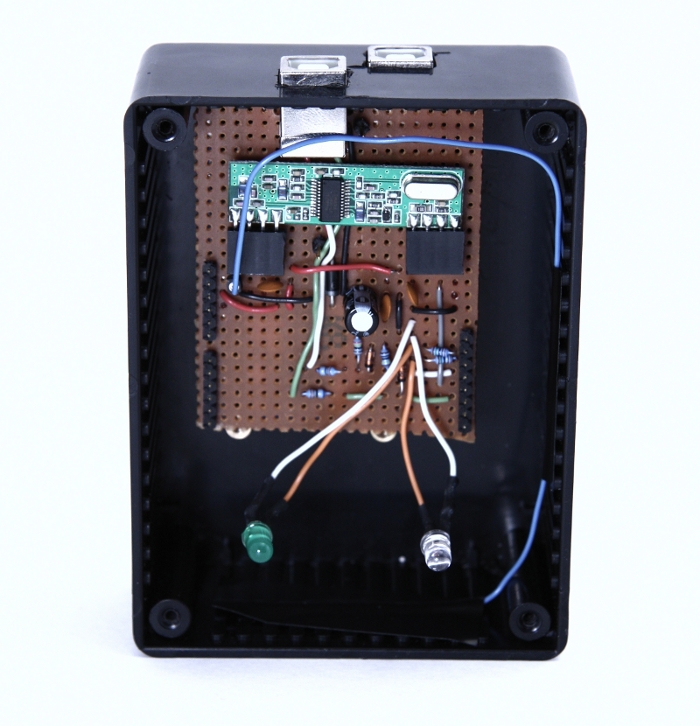
Since I had an arduino to spare, I decided to implement the USB and wireless interfaces as a shield rather than build a specific circuit. Really, the only hurdle was the weird spacing between pin 7 and 8 (why?), but that got solved by soldering angled headers to the side of the perfboard at an offset with the holes they would normally fit in. The wireless receiver was a breeze to connect but the USB interface was slightly more complex, with a couple of zener diodes and resistors to get the correct line levels.
Two versions of the base were created but they only differ in the way they look.
Base version 2
Base version 1
Base version 1 opened
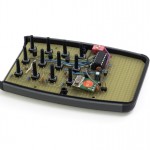
Remote
The base is mostly software but the remote is mostly electronics. The code is essentially a loop that intercepts keypad presses and sends them out through the transmitter to the base. Since it’s battery powered, the complexity of the firmware lays essentially in the power management code as the electronics cannot be left on running at full power all the time.
Remote prototype schematic
I built two different versions of the remote. The prototype which used another ATMega328P (same MCU as the arduino) featured an off-the-shelf keypad and a USB connector with a MAX 1555 for charging. The MCU is left in its deepest sleep mode all the time and is only waken up when a key press occurs. As a result, power consumption is in the order of nano amperes which yields a battery life of a couple months under normal usage when hooked up to a 900 mAh LiPo battery.
Remote version 2 schematic
The second version goes even further into increasing battery life. The ATMega328P, overkill for this application, is replaced with an ATTiny84 and the keypad interface is hooked up a circuit that turns on the micro controller and the transmitter from a fully off state only when a key is pressed. It’s using the same battery as the prototype but the power usage is so minute that after close to two years I have not yet exhausted the battery and measuring the drain is beyond my multimeter’s range. Granted, usage has been on and off due to me leaving for extended periods of time but still, that’s a pretty decent statisctic. So much so that I had plans to convert it to a solar cell and supercapacitor design but sadly, all my prototyping efforts led to failure.
Remote prototype
Internals of the remote prototype
Internals of the remote version 2
The result
It was quickly put together and yielded a result of fairly high quality and convenience for the effort. I’m not saying there is no room for improvement, but it was refreshing to do a project that was not plagued by unforeseen complexity and feature creep. I’ve been using both remotes for the past two years and have been getting months of battery life for the prototype and for its successor, well, it’s still running after two years. Range wise, I can send commands at a distance of about 10 meters through several walls so it more than sufficient.
Since I have no plans to revisit the project in the near future, I’m publishing the source code and the schematics (made with gEDA) up for download on a GNU GPL license. Take note that some of the third-party libraries use a different license which is specified in their respective folders. Should you have any questions, do not hesitate to reach me through the comments or the contact page.
Two days ago I corrupted my file system during a failed resume from standby on Fedora 19. This feature has never quite worked correctly and randomly makes the kernel panic. Usually, I hard reboot my laptop and everything is fine but that time, something went wrong and when it came back up:
systemd-fsck[605]: /dev/sda2: UNEXPECTED INCONSISTENCY; RUN fsck MANUALLY.
systemd-fsck[605]: (i.e., without -a or -p options)
[ 13.652068] systemd-fsck[605]: fsck failed with error code 4.
Welcome to emergency mode. Use "systemctl default" or ^D to activate default
mode.
Give root password for maintenance
(or type Control-D to continue):
In this case /dev/sda2 is my root partition and since it was mounted even in maintenance mode, attempting to run fsck on it would output:
Which makes sense as common knowledge tells us that running fsck on a mounted file system will most likely do more damage to it.
The best option
Your best option is simply to boot into another Linux, be it on a different partition, a USB drive or a CD and run fsck manually on the faulty partition, which can easily be unmounted if necessary because no OS is using it. Easy. Normally yes, but my stupid Macbook Pro 2008 cannot boot though USB into anything else other than Mac OS X, my cd drive has been dead for years and recently, I got rid of my OS X partition. To make things more complicated, I’m in Thailand at the moment and obviously not able to take apart my computer to grab the hard drive and stick into a working system.
The other option (if you cannot boot into another Linux)
In order to assess the damage, I ran fsck in dry-run mode and piped the output to more to make reading more practical:
fsck.ext4 -n /dev/sda2 | more
From there, I could ensure that no critical files had been damaged and while keeping in mind that it’s always a gamble to use a corrupted file system, I proceeded to boot into the system to make some backups. That out of the way, I did some research on the web on how to fix a root file system that I had to boot into and sadly, not many things turned up for its not an ideal solution. Forcing the system to do it a boot time by creating a file named forcefsck and writing y in it (echo y > /forcefsck) at root no longer works and adding fsck.mode=force on the kernel command line did not fix the problem as fsck will not fix errors on its own without authorization, ie: someone to enter yes on the keyboard. Tried a few other tricks but none worked. I had no choice but keep my fingers crossed and use the system as is.
A few days later, I decided to get back to the issue and while researching alternative solutions, I read that it was possible to fix errors on a read-only file system, which it turns out can also be used to boot into. And it worked, so for posterity here is the technique:
Put your root partition into read-only mode by modifying the faulty partition’s line on /etc/fstab (but remember your old settings):
Note: If you’re already in maintenance mode at this point, you may be able to remount your file system in read only mode by running “mount -o remount,ro /” and skipping the reboot (thanks Jay).
Reboot
Switch to runlevel 1 just to minimize the amount of interfering processes (skip this step if you are running the session over SSH [thanks Josh]):
init 1
Fix your file system (replace /dev/sda2 with your partition’s device), which should now work because the root partition is in read only:
fsck /dev/sda2
Reboot
Make your root file system readable/writable:
mount -o remount,rw /dev/sda2
Restore your /etc/fstab to its original state.
Reboot
Voilà, your system is safe to use again. Hopefully this will have gotten you out of a sticky situation like it did for me. If errors keep coming up, it’s probably a sign that your hard-drive is failing and before you loose it completely, you should mirror your data to a new one.